前言
v2ray的vless出现的有段时间了,其中的tcp+xtls方案还是蛮有趣的,这次通过nginx的sni来实现trojan、v2ray与nginx共用443端口的方案,话不多说开始了。
准备工作
1、VPS一台,CentOS 7的操作系统(其他系统也是可以的),本次使用的是vultr的vps
2、域名一个,创建三个子域名,本次trojan使用tj.popyh.ml , v2ray使用v2.popyh.ml , WordPress使用popyh.ml
3、还是耐心吧,稍微有点Linux基础
一点点的lnmp配置
1、配置 MySQL
wget wget https://dev.mysql.com/get/mysql80-community-release-el7-3.noarch.rpm
rpm -Uvh mysql80-community-release-el7-3.noarch.rpm

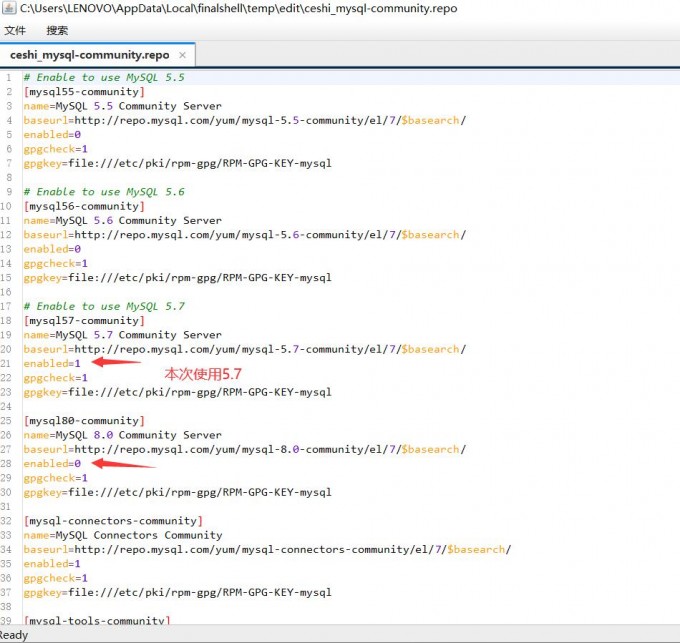
vi /etc/yum.repos.d/mysql-community.repo          #要选择什么版本就令它的enable=1,可以通过Finalshell等直接打开/etc/yum.repos.d/mysql-community.repo修改
#安装 MySQL
yum install mysql-community-server -y
systemctl start mysqld.service
systemctl status mysqld.service
#保护 MySQL
mysql_secure_installation          #设置root密码,后全Y
#连接到 MySQL 服务器
mysql -u root -p
#创建数据库
CREATE DATABASE wp;
2、配置nginx
yum -y install epel-release
yum -y install python-certbot-nginx nginx
#删除nginx默认配置
rm -rf /etc/nginx/sites-enabled/default
3、配置php
yum -y install gcc gcc-c++
yum install https://dl.fedoraproject.org/pub/epel/epel-release-latest-7.noarch.rpm -y
yum install http://rpms.remirepo.net/enterprise/remi-release-7.rpm -y
yum -y install yum-utils
yum-config-manager --enable remi-php73
yum -y install php php-mcrypt php-devel php-cli php-gd php-pear php-curl php-fpm php-mysql php-ldap php-zip php-fileinfo
#启动与开机启动
systemctl start php-fpm
systemctl enable php-fpm.service
WordPress的一点配置
yum install wget git curl -y
mkdir -p /mnt/c/www && cd /mnt/c/www
wget http://wordpress.org/latest.tar.gz
tar -xzvf latest.tar.gz
mv wordpress/* ./

 #配置v2ray和trojan的网页
mkdir -p /mnt/d/www && cd /mnt/d/www
git clone https://github.com/xiongbao/we.dog.git
mv we.dog/* ./
certbot签订证书
  #记得改域名
certbot certonly --standalone -d popyh.ml --agree-tos --email [email protected]
certbot certonly --standalone -d v2.popyh.ml --agree-tos --email [email protected]
certbot certonly --standalone -d tj.popyh.ml --agree-tos --email [email protected]
配置nginx
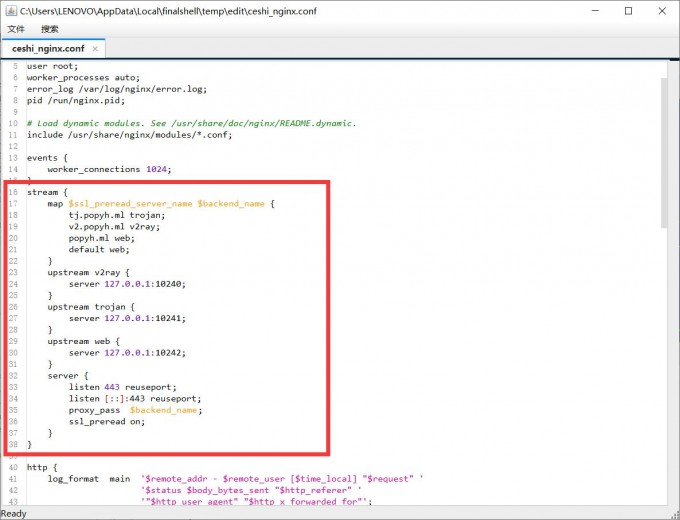
vim /etc/nginx/nginx.conf         #改域名
stream {
    map $ssl_preread_server_name $backend_name {
        tj.popyh.ml trojan;
        v2.popyh.ml v2ray;
        popyh.ml web;
        default web;
    }
    upstream v2ray {
        server 127.0.0.1:10240;
    }
    upstream trojan {
        server 127.0.0.1:10241;
    }
    upstream web {
        server 127.0.0.1:10242;
    }
    server {
        listen 443 reuseport;
        listen [::]:443 reuseport;
        proxy_pass  $backend_name;
        ssl_preread on;
    }
}
写入一个nginx站点配置文件    #下面全部复制,可以新建个记事本复制进去改域名,然后复制进终端,回车
cat > /etc/nginx/conf.d/v2ray.conf <<"EOF"
server {
    listen  10242 ssl;
    server_name  popyh.ml;
    root /mnt/c/www;
    index index.html index.htm index.nginx-debian.html index.php;
    ssl on;
    ssl_certificate       /etc/letsencrypt/live/popyh.ml/fullchain.pem;
    ssl_certificate_key   /etc/letsencrypt/live/popyh.ml/privkey.pem;
    ssl_protocols         TLSv1 TLSv1.1 TLSv1.2;
    ssl_ciphers           HIGH:!aNULL:!MD5;
location ~* .php$ {
    fastcgi_index   index.php;
    fastcgi_pass    127.0.0.1:9000;
    include         fastcgi_params;
    fastcgi_param   SCRIPT_FILENAME    $document_root$fastcgi_script_name;
    fastcgi_param   SCRIPT_NAME        $fastcgi_script_name;
    }
}
server {
        return 301 https://popyh.ml;
                listen 80;
                server_name popyh.ml;
}
server {
        return 301 https://v2.popyh.ml;
                listen 80;
                server_name  v2.popyh.ml;
}
server {
        return 301 https://tj.popyh.ml;
                listen 80;
                server_name  tj.popyh.ml;
}
server {
    listen 127.0.0.1:82 default_server;
    root /mnt/d/www;
index index.html index.htm index.nginx-debian.html index.php;
}
EOF
#测试和启动nginx
nginx -t
systemctl start nginx
systemctl enable nginxV2ray配置
安装V2ray
bash <(curl -L https://raw.githubusercontent.com/v2fly/fhs-install-v2ray/master/install-release.sh)
写入配置            #下面也是整段复制,改掉id和证书路径的域名
cat > /usr/local/etc/v2ray/config.json <<'EOF'
{
    "log": {
        "loglevel": "warning"
    },
    "routing": {
        "domainStrategy": "AsIs",
        "rules": [
            {
                "ip": [
                    "geoip:private"
                ],
                "outboundTag": "blocked",
                "type": "field"
            }
        ]
    },
    "inbounds": [
        {
            "port": 10240,
            "protocol": "vless",
            "settings": {
                "clients": [
                    {
                        "id": "7b4b75ec-62c4-4cc8-867d-7f263ed61058",
                        "flow": "xtls-rprx-origin",
                        "level": 0
                    }
                ],
                "decryption": "none",
                "fallbacks": [
                               {
                        "dest": 82
                      }
                    ]
                },
            "streamSettings": {
                "network": "tcp",
                "security": "xtls",
                "xtlsSettings": {
                    "alpn": [
                        "http/1.1"
                    ],
                    "certificates": [
                        {
                            "certificateFile": "/etc/letsencrypt/live/v2.popyh.ml/fullchain.pem",
                            "keyFile": "/etc/letsencrypt/live/v2.popyh.ml/privkey.pem"
                        }
                    ]
                }
            }
        }
    ],
    "outbounds": [
        {
            "protocol": "freedom"
        }
    ]
}
EOF
#启动与开机启动
systemctl start v2ray
systemctl enable v2ray
systemctl status v2ray #查看是否运行成功trojan配置
安装trojan
bash -c "$(curl -fsSL https://raw.githubusercontent.com/trojan-gfw/trojan-quickstart/master/trojan-quickstart.sh)"
写入配置          #下面依旧是整段复制,改password和域名
cat > /usr/local/etc/trojan/config.json <<'EOF'
{
  "run_type": "server",
  "local_addr": "127.0.0.1",
  "local_port": 10241,
  "remote_addr": "127.0.0.1",
  "remote_port": 82,
  "password": [
    "popyh@@"
  ],
  "log_level": 3,
  "ssl": {
    "cert": "/etc/letsencrypt/live/tj.popyh.ml/fullchain.pem",
    "key": "/etc/letsencrypt/live/tj.popyh.ml/privkey.pem",
    "key_password": "",
    "cipher": "ECDHE-ECDSA-AES128-GCM-SHA256:ECDHE-RSA-AES128-GCM-SHA256:ECDHE-ECDSA-AES256-GCM-SHA384:ECDHE-RSA-AES256-GCM-SHA384:ECDHE-ECDSA-CHACHA20-POLY1305:ECDHE-RSA-CHACHA20-POLY1305:DHE-RSA-AES128-GCM-SHA256:DHE-RSA-AES256-GCM-SHA384",
    "cipher_tls13": "TLS_AES_128_GCM_SHA256:TLS_CHACHA20_POLY1305_SHA256:TLS_AES_256_GCM_SHA384",
    "prefer_server_cipher": true,
    "alpn": [
      "http/1.1"
    ],
    "alpn_port_override": {
      "h2": 81
    },
    "reuse_session": true,
    "session_ticket": false,
    "session_timeout": 600,
    "plain_http_response": "",
    "curves": "",
    "dhparam": ""
  },
  "tcp": {
    "prefer_ipv4": false,
    "no_delay": true,
    "keep_alive": true,
    "reuse_port": false,
    "fast_open": false,
    "fast_open_qlen": 20
  },
  "mysql": {
    "enabled": false,
    "server_addr": "127.0.0.1",
    "server_port": 3306,
    "database": "trojan",
    "username": "trojan",
    "password": "",
    "cafile": ""
  }
}
EOF
#重启和开机启动
systemctl restart trojan
systemctl enable trojan然后打开你的域名进行WordPress的相关操作就行了,数据库:wp ,用户:root
客户端配置
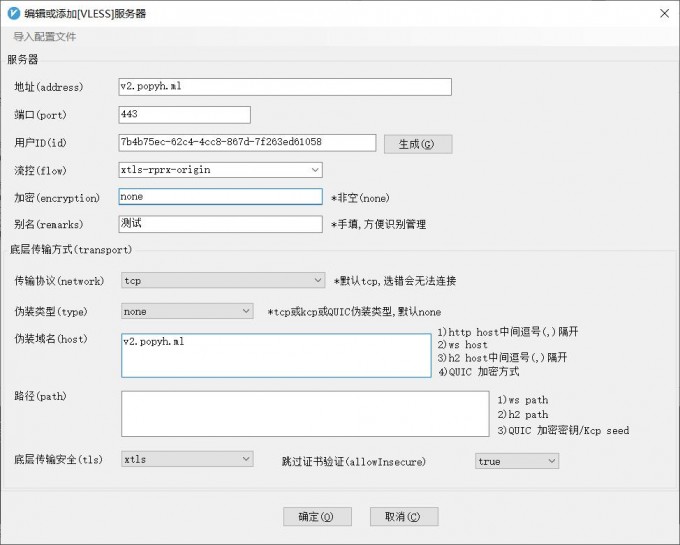
v2rayN #其他客户端大家自己尝试

ps:clash怎么还不支持vless呀,脑壳疼!


这个不是存在获取 real client IP 为 127.0.0.1的问题吗?应该怎么解决??
感谢分享